Views:
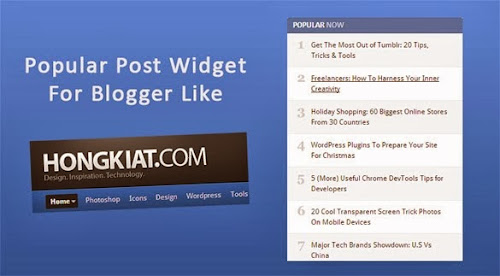
Hongkiat.Com is a very popular and well-known site for Bloggers, Designers. It was founded in 2007 by Hongkiat Lim. after lefting his job. He concentrate on blogging seriously after lefting his job. In now a days Hongkiat becomes very popular blog for web designers and bloggers.
It widely focuses on Photoshop, Wordpress, Tumblr, HTML5 , CSS3, Web 2.0 and much more. Hongkiat has a preety look which makes it more interesting and user friendly. It shows a Professional Looking Popular Post on the Sidebar and when we look at this we always think to use it in our blog. So we will discuss about how you can add Hongkiat like Popular Post Widget in Blogger Blogs. So lets start this amazing tutorial.
How To Add This Widget:
- Open Blogger dashboard → Layout → Add a gadget → Add Popular Post Widget (Do not repeat if widget is already added)
- Now open Blogger dashboard → Template → Html editor
- Now add below given css code just before ]]></b:skin>
.PopularPosts {
width:100%;
margin: 0 auto;
padding: 0!important;
border-radius: 2%;
-moz-border-radius: 2%;
-webkit-border-radius: 2%;
counter-reset: trackit;
box-shadow: 0px 4px 0px -2px rgba(0, 0, 0, 0.1),0px 3px 0px 0px rgba(0, 0, 0, 0.07), 0px 2px 0px 0px rgba(0, 0, 0, 0.03);
-moz-box-shadow: 0px 4px 0px -2px rgba(0, 0, 0, 0.1),0px 3px 0px 0px rgba(0, 0, 0, 0.07), 0px 2px 0px 0px rgba(0, 0, 0, 0.03);
-webki-box-shadow: 0px 4px 0px -2px rgba(0, 0, 0, 0.1),0px 3px 0px 0px rgba(0, 0, 0, 0.07), 0px 2px 0px 0px rgba(0, 0, 0, 0.03);
border: 1px solid #EEE;
}
.PopularPosts h2 {line-height:1.5em!important;display: block!important;font-family: "Calibri","Droid Sans",Tahoma,Geneva,sans-serif;font-weight: 500!important;
text-transform: uppercase!important;padding: 5px 10px!important;margin: 0!important;color: #D1D9E5;background-color: #5A77A0!important;text-shadow: 1px 1px #486286;border-bottom: 1px solid #4D678C;
box-shadow: 0 5px 12px -7px rgba(0, 0, 0, 0.5);
-moz-box-shadow: 0 5px 12px -7px rgba(0,0,0,0.5);
-webkit-box-shadow: 0 5px 12px -7px rgba(0, 0, 0, 0.5);
font-size: 16px!important;
border-top-right-radius: 3px;
border-bottom-right-radius: 0;
border-bottom-left-radius: 0;
border-top-left-radius: 3px;
-moz-border-radius-topright: 3px;
-moz-border-radius-bottomright: 0;
-moz-border-radius-bottomleft: 0;
-moz-border-radius-topleft: 3px;
-webkit-border-top-right-radius: 3px!important;
-webkit-border-bottom-right-radius: 0;
-webkit-border-bottom-left-radius: 0;
-webkit-border-top-left-radius: 3px;
bottom:0;
top:0;
}
.widget-content.popular-posts {border-top: 1px solid #CCC;padding: 0em;margin: 0 0 0;
}
.popular-posts ul{padding:0!important;margin:0!important;}
.popular-posts ul li {
border-bottom: 1px solid #f1f1f1;
list-style: none outside none !important;
margin-left: 0 !important;
overflow: hidden;
padding: 10px 0 !important;
transition: all 0.25s linear 0s;
counter-increment: trackit;}
#PopularPosts1 li:nth-child(odd) {background: #F9F9F9;}
#PopularPosts1 li:nth-child(even) {background: #FFF;}
#PopularPosts1 li:first-child {border-top: 1px solid #f1f1f1;}
#PopularPosts1 li {padding-right: 1em !important;padding-left: 1em !important;}
#PopularPosts1 ul li:before {content: counters(trackit,".");padding: 0 .1em 0 0;font-size: 20px;font-weight: bold;color: #D8D8D8;float: left;}
.PopularPosts .item-thumbnail,.PopularPosts .item-snippet {display: none;}
#PopularPosts1 a:hover {text-decoration: underline;}
#PopularPosts1 a {color: #3F3F3F;font-size: .9rem;}
.PopularPosts .item-title {padding: 0 0 .2em 1.5em;}
- After adding the code save your template and preview the changes made in your widget.
So that's a little hack to add Hongkiat like Popular Post Widget in your Blogger Blog. Now It's your turn to share this post with your friends and write your review in comments till then Peace, Blessings and Happy Blogging.


Wow, amazing post! Really interesting, thank you. Web Designers
ReplyDelete